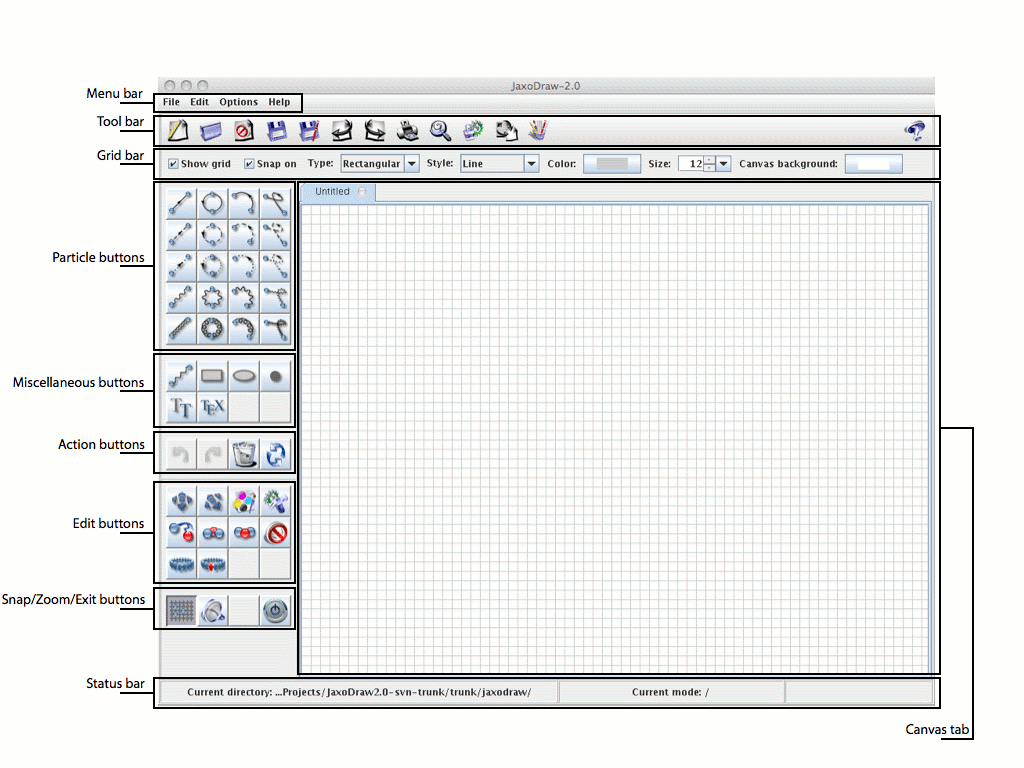
Screen elements of JaxoDraw
After first execution of the program, the user is presented the graphical user
interface as shown in Fig. 1.
Figure 1:
The graphical user interface of JaxoDraw at start-up.
The screen of JaxoDraw is divided into six main sections:
- The menu bar on top
- The tool bar just below the menu bar
- The grid bar just below the tool bar
- The button panel on the left
- The status bar on bottom
- The drawing area (the canvas) in the center
The tool-, grid- and status bars may optionally be switched off in the preferences
dialog or under the options menu.
In the following we will describe each of the above sections in greater detail.
The menu bar contains four main menu bar items:
File, Edit, Options and Help.
File
In this menu there are the following entries:
- New:
-
Begin a new diagram; this item contains a sub-menu
with New graph and New tab entries;
while the first will delete the current graph and begin a new graph on
the same canvas, the latter allows to add/remove several canvas
tabs (see the section on tabbing
for more information).
- Open:
-
Open an existing diagram.
This pops up a file chooser dialog where the user may indicate
a file (the extension must be .xml) that was stored in
an earlier session. If the
current graph is not saved, the opening will
be done in a new canvas tab.
- Open recent:
-
A menu containing the most recently modified
files, so they can be rapidly accessed again.
- Close:
- Close the current tab (except if there is only one left).
- Save:
-
Save the current diagram as a .xml file,
using the last specified name. If no name was specified,
a file chooser menu is popped up. The current graph is then
saved in an xml file that may be opened in a later
session.
- Save As:
-
The same as Save, but always pops up a file chooser menu
to save the current plot under the chosen name.
- Rename tab:
-
Allows to change the name of the current tab.
- Import:
-
Import an existing LaTeX file. The extension of the file must
be .tex (see the section on
importing LaTeX files
for more information).
- Export:
-
Export the current file. This entry pops up a dialog where the
user may choose among several export file formats.
Possible options are:
-
LaTeX->EPS:
Export the diagram to an Encapsulated Postscript (.eps),
through a dvips command executed on a
previous LaTeX compilation.
-
LaTeX:
Export the diagram to a .tex text file.
-
PS Portrait: Export the diagram to a Postscript file
(.ps) in portrait mode.
-
PS Landscape: Export the diagram to a Postscript file
(.ps) in landscape mode.
-
EPS: Export the diagram to an Encapsulated Postscript
file (.eps).
-
JPG: Export the diagram to a JPG/JPEG file
(Joint Photographic Experts Group, .jpg).
-
PNG: Export the diagram to a PNG file
(Portable Network Graphics, .png).
If you have installed any export plugins, additional options
may be displayed.
Finally, notice that in
the export panel there is a button that allows to preview any
of the above output formats. Note that in order to preview any
of the Postscript exports, you must indicate a Postscript
previewer in the preferences dialog (since there is no Java
internal Postscript renderer). For previewing output in text
format, you may still indicate a preferred text editor but if
you do not do so, a Java internal text previewer is used by
default.
- Print:
-
Print the current diagram. This opens the standard Java
printer dialog where any installed and configured printers
are detected automatically. Note that printing to a file
should be equivalent to the corresponding Export -
Postscript option.
- Quit:
- Exits JaxoDraw.
In between the Print and Quit entries there
is a 'recent files' panel, in which the four most recently modified
files are displayed, and can be rapidly accessed by a mouse click.
Edit
There are four entries that lead to an immediate action that are:
- Undo:
-
Undo the last operation done on the canvas.
The maximum number of steps that JaxoDraw keeps track of
for undo operations can be configured in the Preferences.
- Redo:
-
Undo the last Undo operation.
- Clear:
-
Clear the canvas by removing all the objects;
this command only removes the visible objects from the screen,
it does not affect any values associated with the graph.
- Paste:
-
Paste the objects currently in the clipboard to the current canvas (see the
clipboard section
for information on how to copy and paste objects from the clipboard).
- Refresh:
- Refresh the canvas by redrawing all the objects.
The other entries of this menu just put the program into the corresponding
Edit mode, i.e.,
little red squares are displayed on certain points of every object
(for instance on the end points of lines). When the user clicks on
one of these ``handles'', the corresponding edit operation is being
carried out on the selected object. Notice that some of the handles of an
object may not be active for a particular operation; for example, loops
cannot be resized via the handle in the center. These 'inactive' handles
have a different color.
- Move:
- Click on a handle and drag the selected object to a new position.
- Resize:
-
Click on a handle and resize the selected
object by dragging. In the case the selected object is a
group, just click (no drag) on one of its handles:
you will be prompted a panel asking for a scale factor,
that will be used to rescale the group.
- Duplicate:
-
Click on one object's handle to duplicate the corresponding
object. Drag to move the duplicated object to a new position.
- Color:
-
Change the color of the selected object.
If the latter is a filled object, then the color affected
by the eventual change will be the filling one. See the
section on colors for information
about the available
colors. Notice that the color can be also changed when
editing an object: in this case for filled objects both
the line and filling colors are available (with the
limitation described in the section on
colors).
- Edit:
-
Edit the selected object. This operation will
pop-up a panel with all the editable parameters of the
chosen object (e.g., its position, size, color(s),
etc.), thus allowing for its fine tuning. Operations that
are not possible in the interactive drawing (such as
removing an arrow from a line, choosing the double line
version of an object, etc.) are possible through editing
the object.
- Delete:
- Click on a handle to delete the corresponding object.
- Background:
-
Click on a handle to put the corresponding object
in the background.
- Foreground:
-
Click on a handle to put the corresponding
object in the foreground.
- Select:
-
Allows to select an arbitrary number of objects so that some editing
operations can be carried out on them simultaneously.
To select a group of objects, click on the handles of the desired objects.
Selected objects will have their handles filled in light gray, clicking
again on the handle will unselect the object. The select operation is
finished when the right button is clicked (the middle button cancels the
operation).
There is an alternative (faster) way of selecting objects described
in the section on grouping.
- Ungroup:
-
When this operation is chosen, only the
handles of group objects will be displayed. When clicking
on one of these handles, the corresponding group breaks up
in its constituent objects (which may again be groups).
- Zoom:
-
This operation does not display any handles, instead,
clicking on the canvas opens a 'dynamical zoom window'
(dynamic meaning that it can be dragged over the canvas) with a
magnified view of the region under the cursor. The three mouse
buttons give different sizes for the zoom window.
Options
The first three entries are:
- Add description:
-
Add a text description to a graph. This
will appear as a comment in all output files.
- Add LaTeX package:
-
Allows to specify additional
packages that will be included in any LaTeX output via
the \usepackage{} command. Notice that if you have
LaTeX labels that require dedicated packages to show up
correctly (e.g. the \square command from the
amssymb package), you have to explicitly include them here,
otherwise the LaTeX compilation will fail.
- Move graph:
-
This will pop up a small panel that allows to displace the whole graph
of the current tab, ie all objects of the graph are moved by the same
amount.
The next entries in this menu allow the user to specify how JaxoDraw
should look and behave.
- Look And Feel:
-
Set the preferred Look And Feel for this
session. Notice that the allowed Look And Feels will change
according to the OS or the platform from where
JaxoDraw is executed, and that there might be
differences in some layouts, in particular with icons in
the tool bar.
- Language:
-
Set the preferred language for the current
session. Currently supported languages are English,
German, French, Italian and Spanish. Notice that there are
minor bugs in some Swing internal components that do not
allow full internationalization
(see the bugs section).
For JaxoDraw, this effects only some text fields in the
FileChooser and in the ColorChooser dialogs.
- Default mode:
-
Here the user can choose a default return mode, i.e., after
each operation, the program automatically returns to this mode.
- Vertex types:
-
Select the type of vertex to be drawn
when in Vertex mode. The currently available types are
dot, circle cross, square, cross and triangle. Choosing
one vertex type will change the icon of the Vertex button
in the button panel to the corresponding vertex. This menu
can be also accessed through right-click on the latter
button (see the section on the
button panel).
- Show Toolbar:
-
Selects whether or not the
tool bar is visible.
- Show Statusbar:
-
Selects whether or not the
status bar is visible.
- Show Gridbar:
-
Selects whether or not the
grid bar is visible.
- Antialias:
-
Enables/Disables the use of antialias
(both on graphics and texts). The graphics quality is
usually better with antialiasing turned on. This goes with
the cost that graphics rendering may be slower on some
machines and you may need to refresh the screen from time
to time, especially after a number of editing operations.
- Arrow:
-
Selects whether or not arrows should be drawn
by default on all objects that support them.
- Grid:
-
Here the user can choose wether the grid is displayed on the canvas.
Note that this only draws the grid points on the canvas, you still
have to activate the grid if you want to use it.
- Snap:
-
Activates the grid.
- Plugin Manager:
-
Pops up a dialog that displays the currently installed plugins.
Clicking on one of the installed plugins (if any) shows some information
about the chosen plugin, and activates the 'Uninstall' button to
uninstall it. The 'Install new' button allows you to choose a new
plugin to be installed. See the section on plugins.
- Preferences:
-
Pops up a dialog where the user may choose several settings to be saved
on a permanent basis. The only required settings that should be filled
in are a default Postscript viewer (used for previewing the printer or
direct Postscript output), and the paths to your latex and
dvips executables (used for LaTeX->EPS preview). The rest
are optional convenience settings (in particular you do not need a default
HTML viewer or text editor since Java can render tese foramts natively).
Clicking OK will apply the specified values for the current session
without saving them in the system preferences, clicking Save will
save the settings without applying them to the current session, the
button Clear only clears the text fields of the default previewers,
Reset restores all the values to their current default settings and
Cancel closes the Preferences dialog without applying any changes.
See the resources section
for more information on setting preferences.
Help
In this menu one has:
- About:
-
Provides informations about the JaxoDraw
version you are running.
- System Info:
-
Provides informations about the system
on which you are running JaxoDraw (current user,
operating system, Java installation). It is a good idea to
furnish these informations, together with the About
ones, when reporting a bug.
- User guide:
-
This entry will pop up a new window with
the user guide in HTML format. If a default HTML viewer
has been chosen in the Preferences dialog, it will be used,
otherwise a Java internal previewer is used by default.
As already noted, the tool bar may be switched on and off from the
Options menu.
When switched on, it contains buttons whose actions are identical to the
menu entries New Graph, Open, Close,
Save, Save As, Import,
Export, Print, Paste, and
User guide.
Furthermore, there is a 'Latex preview' button that does a
LaTeX->EPS preview, a 'Watch file' button (see the
watch file section) and
a button to bring up the Preferences.
The grid bar
The grid bar may also be switched on and off from the
Options menu. It allows to customize various settings
of the grid, like grid type, style, size and color.
The button panels are located on the left of the screen.
Notice that generally, when the user pauses with the cursor over any of the
program's buttons,
a tool tip for the button comes up (this is also true for the tool bar entries).
There are five different panels:
- Particle buttons:
-
There is one button for each particle type: fermion (straight line), scalar
(dashed line), ghost (dotted line), photon (wiggled line) and gluon (pig-tailed
line); and four object types: lines, arcs, loops and beziers. When one of these
buttons is clicked the program goes into the corresponding drawing mode,
i.e., no handles are shown on the screen and the user may click on the
canvas and then drag (for lines and loops) or click again (for arcs and beziers)
to start drawing the corresponding object. Fine tuning of the objects can
be achieved, through the Edit operation.
- Miscellaneous buttons:
-
There are buttons for drawing blobs (ellipses), boxes, vertices and zig-zag
lines, as well as buttons that allow the insertion of Postscript text and
LaTeX text into the graph (see the text
section for information about adding text to diagrams).
When one of these buttons is clicked the program
goes into the corresponding drawing mode. Through right-clicking on the vertex
button a pop up menu will appear, in which the user can choose the type of
vertex drawn when in vertex mode.
- Action buttons:
-
These are the buttons that lead to an immediate action, and correspond to
the Undo, Redo, Clear, and
Refresh entries already described.
- Edit buttons:
-
The action of these buttons (which are Move, Resize,
Color, Edit, Duplicate, Foreground,
Background, Delete, Select, and
Ungroup) is equivalent to the ones described in the
Edit menu panel section. When one of these buttons is
clicked the program goes into the corresponding edit mode.
- Grid, Zoom and Exit buttons:
-
The grid button turns on the grid so that the user can choose only certain
points on the canvas for placing his objects. Notice that this does not change
any objects
already present on the screen. The size of the grid can be specified by the
user in the Preferences item of the Options menu.
The zoom button switches into dynamical zoom mode to magnify some section
on the canvas. The exit button quits JaxoDraw.
The status bar
The status bar may be switched on and off in the Options menu item. If it is
switched on, the status bar contains three areas: one to display the current
directory, one to display the current drawing mode and one that displays the
current coordinates of the cursor on the canvas.
The canvas
This is the main drawing area. After choosing a drawing mode from the button
panel, the user may draw the corresponding object by left-clicking and dragging
on the canvas.